Friday, September 2, 2011

Craft Night!

Thursday September 15th we will be having the first of our brand new exciting monthly


CRAFT NIGHT!


We are going to be making double sided letter blocks that say NOEL/FALL or AUTUMN/WINTER. Your choice!


We will provide: the vinyl (black, chocolate brown, cream, or white) and the wood blocks.


You will provide: Yourself and your paint colors/brushes!


I believe the time will be 7 pm and the place will be Amanda's home!


If you are here in Tucson and would like to join, let me know (fb or on here!)


Totally forgot to add prices $3 for Noel/Fall and $4 for Autumn/Winter!


Examples!


Name blocks

While I was pregnant and decorating Michael's room I knew I had to make him name blocks!


They were so fun and easy, that I decided to make them for my friend Heather's new baby Hunter and her older son Cameron!


I went to Home Depot and bought wood, thankfully they had some great looking cull wood [$.49/piece!] (and had the man there cut it for me in 4"x4" blocks).


I also picked up some scrap book paper [$.50-$1/piece] and little "pretties"[I think I spent around $5 on these, its better to get them when they are on sale! Next time I'll stock up!] to decorate with.


I then painted the blocks white, cut vinyl using my handy dandy cricut. Modgepodged the vinyl to the wood. Put the letters on and then spruced it up with the pretties!


It was a fun, easy, and very affordable! :)

Thursday, July 14, 2011

Headboard

Before my in-laws moved in last Saturday I was working on (and finished) a project one year in the making!

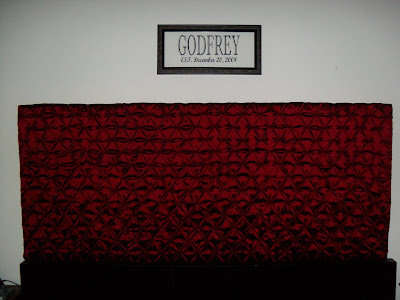
A pretty burgundy/red headboard!

First I went to Home Depot bought a piece of plywood and had them cut it to my specifications (The whole piece was about $9 and there was quite a bit left over for other projects!)

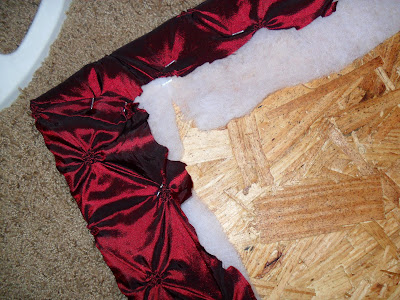
Then I covered the plywood with batting. I could have used more but I only had one bag (because I'd bought it a year prior without knowing what I was going to do!)


I stapled the batting to the back of the plywood using a staple gun (A girls best friend!)

I then (used a storage crate) laid out the fabric over the plywood and batting.


I then stapled the fabric to the back of the plywood and cut off the excess (for another project! Matching pillows!)


My husband was not completely thrilled when I told him I wanted to hang this huge piece of plywood above our bed AND that I had already made covered it and we couldn't just drill through it...SO we drilled part way and hung the nails in the wall, hoping that we would be able to fit them in the holes.


And MIRACULOUSLY, we did it! It was quite a chore...I would suggest putting nails in the board before hand or putting a lip on it.


I also did a little side project and took a picture frame that previously hung in our bathroom and removed the back and cut some vinyl out with the cricut to hang above our bed. Im not quite done decorating. I'd still like to frame our sealing certificate and take up some more wall space, but thats another day!


Thursday, July 7, 2011

Apparently...

Mommy is not a techy.

I tried to make a button for this blog to post on my family blog...

welp. That was a failure.

Maybe I'll try again later.

As for now here's a sneak peek of a project :)


hmm what could it be? ;)


And one of the babe for good measure.

Tuesday, July 5, 2011

Yoyo flowers


I've been on this yoyo kick. I make them all of the time for everything (see below, the wreath and kitchen tools holder!) I even have a couple more projects I'm using them for coming up!


Sunday night when thinking about what my adorable family would be wearing for the 4th of July I realized I didn't have anything patriotic to wear, SO what did I do? Well I whipped up 2 small blue yoyos and 1 medium red yoyo and pinned them to a white shirt! How festive is that?!


I also wanted to share the video I used as a tutorial! They make things SO easy! :)


Tile Decor

This right here is my third or fourth love. You know right behind God, family, chocolate :)


He does amazing things and makes everything easier!


My beloved Cricut Expression Machine!


Because he is so easy to use, I was able to whip this up the other day :) The hubby and I decided kindness is important to us and we want to remember to be kind. What better way than a quote on a tile in your living room!? [Oh and thats my cute dog!]

Fabric Flower Wall Canvas

I have the hardest time decorating bathrooms! I'm one of those people that loves quotes. Ask my husband, they're all over. He'll tell you how much he LOVES quotes. But my dilemma (at least thats what my 16 year old brother in law would call it) was what to put on the wall in the bathroom. I really feel like a quote would not do. What would you say? Hope it comes out nicely? (Ok. I'll stop with the potty humor).


As I was preparing for my shopping trip to Joann's to get fabric for some pillows I am going to make I had an epiphany!!


Those big flowers I'm planning to sew on my pillow would look great on a canvas, in my bathroom (without any words!) Hallelujah! (I had to look up how to spell that.


So I bought some extra quilt squares and canvas to work on my wall art.


First I painted my 16x16 canvas black.


Then I started on the flower. I cut the quilt squares into strips about 1.5-2 inches wide. I then cut out a circle the size I wanted the flower to be using scrap fabric so I'd have something to sew the fabric strips to.


I then folded a fabric strip lengthwise in half and pinned it down to the scrap fabric circle. I folded/pinched the fabric then stuck a pin in it to make it stay and continued that until I had my circle strip.


After that circle was finished I hand stitched it to the fabric circle then started my next layer and repeated that until the circle was full, making sure to get the stitches where the folds were so they didn't come apart.


I then hot glued a shiny button in the middle. (you could sew it but Im all about the hot glue..nice and messy. yes!) The again used my hot glue to secure the flower to my canvas and


VOILA!
Its complete!


I'll work on taking more pictures during the process..I just get caught up! :)